When my pdf converter crashed I needed a quick and easy way to convert word docs to PDF’s…and if it’s free, hey that’s just a bonus. After doing an online search I found zamzar.
One thing that immediately turns me off with alot of these sites is you need register or create an account which is an easy way to sign up for bs spam that I have no desire to receive. My emails are crowded enough as it is!
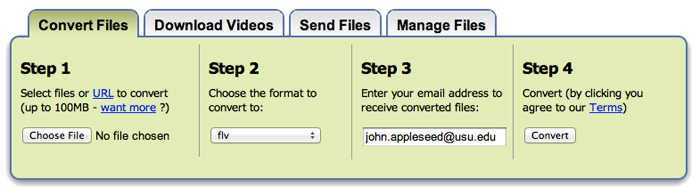
With zamzar all you need to do is choose your file,the format to convert it to, your email and press convert. THAT’s IT!
I have NOT RECEIVED ANY SPAM whatsoever entering my email so I high recommend it. All the email address is for is to email you the link to download your file.
Remember when you went into a Tower Records to buy cds…? Yea, me neither. That’s exactly what Napster caused, the destruction of the music industry as we know it because mp3s gave you the ability to get all the music you want for free. The same holds true for Computer programs. I don’t have the facts in front of me but I’m sure Photoshop is one of the most pirated programs out there. And it’s unfortunate because in the end it ends up being us loyal people that bought the shit the proper way that end up suffering.
There’s no question that web developers, web designers, and graphic designers are the best fields to be in right now and with the Freelancer BOOM that’s occurred over the past 3 – 5 years there’s been an unprecedented amount of copies of the programs like Photoshop and Illustrator that’s been pirated and pirated and pirated. Why pay when you can get it for free right? A lot of fault lies on Adobe, you make a group of programs like the Creative Suite over $1000 and guess what… people are going to figure out how to steal it. Mark the price down and maybe…just maybe people will purchase it legally.
But whatever the case those days are over now with the Creative Cloud. Adobe says they “believe the creative process can be better” … what they really mean is it can be more “profitable”. I mean damn what a deal for them?? Monthly subscribers vs Single one time payment? You got us caught on a leash for life that way! I saw the monthly option a while back on their site and I thought “Oh that’s a good idea for people that only want to use it for a little while.” Little did I know that it was a test to maneuver people away from the old cereal boxes of software cds to the up and coming cloud based world… sneaky bastards.
So in a nut shell what the Creative Cloud is you pay a monthly fee to access all of the latest and greatest design tools that we hold so near and dear [and count on for our livelihood in some cases] instead of going to the store and buying the programs. Then you can use it like you normally would execpt with a MUCH heftier price tag attached to it. And, oh boy, it can even connect to your Behance account to “find inspiration, showcase your work, get feedback, and gain global exposure for your portfolio”… yay.
The price tag for Students is currently $20/month for the first year… but you know that’s going to go up. SO the first year student can maybe afford it but fast forward to when they have to pay $30 or $40 the next year then you run into trouble.
For us none students we’re looking at $50/month…. good god. So now someone out of college who works from home will have to pay rent, cable, internet, electric, netflix, STUDENT LOANS, utilities (I’m, assuming), car payments or transportation fees, car insurance, cell phone, food/beer, maybe news subscriptions, and oh yea another $50 a month for ADOBE…. It’s as if society doesn’t want us under 30 people to live on our own…
For us already invested in this industry, hey it could be a good thing…
The upside I see to this is it could help weed out the new developers and graphic designers from entering the market in the future since there’d be a heavy price tag to pay to do it… I can’t see most college kids who can barely afford their own food and beer to be able to shell out $20/month for this. The computer room is going to get MIGHTY crowded…
In closing, I say to all my software designers out there now is the time to end the monopoly Adobe has and create an open source program like you did with Microsoft Office or even just a similar lower cost version for Creative Suite… Think about it. Your market possibilities just opened up TEN FOLD which means, if done right, you could be a millioniare.
Took me a bit of time to figure this out myself so I figured I’d post it on my blog to make it easier for all of you. In a business world where you need to be in 40 places (facebook, twitter, instagram, pinterest, wordpress, blah blah blah) at once just to survive on a social media front it certainly helps to condense all this so that you press submit in one platform and it’ll follow suite to all your others.
Combining Facebook, Twitter, and Instagram were fairly simple since apps already exist in their backend to accomplish this. For those who may need this info, I’ll provide it at a later date. Posting your wordpress blog posts to your facebook page however was a little more tricky to figure out but once you follow these instructions you’re gonna go “Oh thank fu&#-ing god!”
So if you have a wordpress blog there’s a VERY handy plug in I discovered to accomplish this. Go to Plugins > Add New and type in “Facebook Page Publish“. There should be two options at show up first both with this name. “Facebook Page Publish” & “Facebook Page Publish 2“. IGNORE the first one. This is an older version and it sucks because you’ll go through the motions and won’t be able to connect. Instead install and active “Facebook Page Publish 2”.
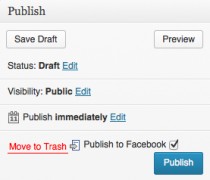
Next go to Settings > Facebook Page Publish. Follow these instructions they provide or read below to get the Application ID and Application Secret code. Next Press the “Grant Access” button and follow facebook plugin options so that the app can get permission to post on your page. Finally go to my previous post to get the link to retrieve your Page or Profile ID and press “Save Changes” and that’s IT. Now when you create a post there will be a check box above the Publish button that says “Publish to Facebook“.
1. Click Here and register as a developer, if you haven’t already.
2. Click “Register as a Developer” and accept the terms, then just press skip a couple times as the next pages are just survey crap.
3. Once you are registered as a developer select “create new app“, name it “Post My Blog” and press continue (*ignore the name space and hosting option as you won’t be needing it). This won’t affect your page in anyway, it’s only to create the app that will allow you to connect the blog with facebook.
4. Do the damn Captcha thing that only god can read and press continue
5. Now you have your App ID and App Secret but jus ta couple more steps
6. Under Basic Info type in your domain link to your blog without the http://www in the App Domains field: (e.g “streetcarpro.com“)
7. Then at the bottom select “Website with Facebook Login” and type in your domain again this time WITH the http://www (e.g. “http://www.streetcarpro.com“)
8. Lastly select the “Disabled” button to make the app like and out of the developers sandbox.
9. That’s basically it for that now go back to the above instructions on finalizing the plugin connection…
For any app developers, bloggers, or facebook novices out there that are in need of knowing how to find your facebook id after creating a customized url here is a VERY VERY VERY easy link I found to get it:
All you need to do is replace “longislandwebsitedesigner” in the url bar with whatever your customized page link is and press enter.
If you don’t have a customized url then it’s a piece of cake. Just view your page or profile and it will be that long string of numbers at the end of the link.
Ex: https://www.facebook.com/pages/Online-Thrift-Shop-Current-Thrift/505729602798318<– Thats it
There are a few different websites I research for inspiration or just to keep up to snuff within the internet / graphics / web design world… Noupe.com is by far my favorite. They have a mega-load of content that can help with Graphic Designers, Web Designer, Web Developers, App Developers, Mobile Design, Photoshop, releases and the like.
This article I thought really put in perspective the steps photographers should be taking to capture a real experience on camera. I’ve been to the Met ALOT in the past few years and as much as I enjoy looking at paintings by various artists photography has been my art poison of choice. It’s all has to do with real experiences, and capturing that I just find to be inspiring and at times life altering… Ansel Adams has always been a personal favorite (corny and cliche but true) of mine and glad to hear he’s mentioned here.
There are 10 steps in all but I’m showing the first 5. Click the link at the end to read all 10.
Famous photographer Minor White once said “One should photograph objects, not only for what they are, but for what else they are.” What he meant by this is that a photographer should learn to think abstractly about composition. Try not to think literally about objects in your scene—don’t think of them as waterfalls, mountains, trees, etc.—but rather think in terms of the shapes they form, perspective (depth and scale), space (the placement and arrangement of elements), and color. This process is an important first step: once you start seeing elements of a scene in abstract terms, then you’re ready to start tackling advanced compositional techniques.
2. Get your feet moving
Ansel Adams once said “A good photograph is knowing where to stand.” Thoroughly exploring a scene is the best way to ensure that you find something compelling and original. A little bit of curiosity goes a long way—if you aren’t asking yourself questions like “What would the view look like from that small hill over there?” then you are limiting yourself to only the most obvious shots. If you want to make unique and meaningful compositions, you need to get your feet moving, and experiment with different angles, focal lengths, and relative positions. Only then can you really see what the world has to offer.
3. Use “power shapes” to create bold compositions
Simple shapes such as triangles, circles, radial patterns, curves, lines, and zigzags attract the eye, lending themselves to simple yet bold compositions. Sometimes the shape can be the basis for the composition itself, whereas other times it can merely be the background structure for a more complex composition.
4. Create depth in your photos
Manipulation of the relative size of objects can help you create depth in your photographs and lead the viewer’s eye into the scene. One powerful technique that does this is called forced perspective, which employs optical illusion to make an object appear more prominent than it actually is. This is usually accomplished by getting close to a near object with a wide-angle lens, thus exaggerating its size and visual importance relative to more distant objects. Forced perspective can become a powerful tool used to create dynamic visual relationships between near and far objects.
5. Direct the viewer’s attention
Leading elements are useful for compelling the viewer’s eye into the photo. Leading lines which stretch from foreground to background are especially powerful. Other shapes placed in the foreground can accomplish the same thing; a curving river can encourage the eye to meander throughout the scene, whereas a triangle-shaped rock can point into the composition. Multiple visual elements, arranged properly, can encourage the viewer’s eye to travel deep into the scene; a near-to-far, bottom-to-top visual progression is often particularly effective.
This cute little ball of fur is our loving cat, Lulu. You’ll be seeing alot of her on this blog as she tends to get into everything no matter how much I tell her not to…
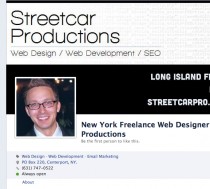
A little intro on myself, my name is Tom Dintrone and I am a Freelance Web Designer on Long Island. I’ve worked with many companies large and small on their web related products. I’m highly experienced when it comes to web design, development, database management, social media marketing, search engine optimization, and the like.
I’m 29 (almost 30) and grew up in Brightwaters and went to Bay Shore High School (graduated in 2001). I’ve been a drummer all my life (18+ years) and have played with too many bands to count. I switched to guitar in college and am well versed in that as well. As a surprise for xmas a few back my wife got me an American Fender Jaguar in Olympic White which completed my guitar collection….and yes it sounds f*cking amazing! I also currently play percussion for DJs at events like weddings, social/corporate events, anniversaries, etc. all over Long Island, Manhattan, and New Jersey (feel free to contact me if you’d like me to perform at yours). That’s about as much personal info that I’m willing to dole out.

![Enhance Your Photography [article excerpt]](http://streetcarpro.com/nyc/wp-content/uploads/2013/05/Light-is-Life-210x140.jpg)