
After great frustration with this I finally found an IMMENSELY simple answer. If you have custom shortcodes using HTML tags the WordPress ediotr may mess them up adding the normal “p” tags within it. Just add this code to your functions.php file and add the “raw” short code on either side… problem SOLVED.
Category: wordpress
WP_query exclude custom category posts of a custom taxonomy

So let’s say you created categories of a custom post type and then use a template to display those posts using the WP_query() function. THEN you want to filter those results further by excluding a particular custom category or categories you created. Look no further…
Straight from the WordPress Comments section: Click Here for the code
Pointing your home site’s url to a subdirectory using htaccess for wordpress

Exactly what it sounds like. Just saved me a butt load of time and a mess of annoying phone calls to the hosting server. Easy code editing then moving of the index.php & .htaccess files. Maybe this’ll do the same for any other developers out there in a bind.
Display Popular Posts by Views / Clicks in WordPress

Cool code I found that allows you to filter and display a WP site’s posts by views or “clicks”. If also works for custom post types as well perfectly. Simply add the filter “post_type => YOUR_CUSTOM_POSTTYPE” when you call the loop on the front end in the WP_QUERY function.
WordPress: Hide Edit Profile Link
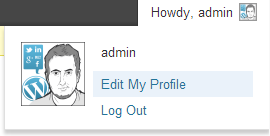
In case you need to give a customer access to a website without being able to edit their profile. *Gives you an option for inputting custom text where the profile page would normally be.
Simply place the code at the bottom of your functions.php page!
Track Form Submissions Through Google Analytics With Contact Form 7 in WordPress

Another piece of code that allows you to track successful form submissions through the Contact 7 form plugin. Very simple!
W3TC Plugin – Automatically Clear Cache On Updating Post

Here’s a link to a code you put in your functions.php page that allows you to automatically clear your cache upon updating or saving a post. No more need to remember to empty it with this handy line 🙂
Creating Custom WordPress Shortcodes Using PHP

Here’s a link for an explanation on creating your WordPress Shortcodes:
Call a WordPress Widget with a Shortcode

Had this issue today where I created a WordPress shortcode and put it in a text widget but when I saw it live it didn’t convert the shortcode.
Below is an article that gives you the code you need to put in your functions.php file to allow you to display them properly in the widgets.
Display Featured Images In WordPress Admin Post List
Here’s a snippet of code to add to your functions.php page in order to view your featured image in your posts admin section:
Worked like a charm!
WordPress: Get Featured Image URL
Ever needed to get ONLY the featured image url? Below is an easy WordPress Support forum article I’ve referred to to get it. Easy as pie.
How to Easily Add Custom Classes to Your First and Last Menu Items in WordPress
A pesky evil WordPress decided to not supply automatically but here’s a link to a good hack for it:
I particularly like this article because it also provides an extension function that applies first and last classes to nested menus as well!
Changing Directions

So I’ve decided to change directions with this blog as I’m now much busier than when I began and do not have much time to write full articles.
I’ll write a random article here or there but what I’ve decided is a much better method to help my web design & development madness.
I CONTINUALLY search the web for tips and articles myself whenever I run into a crunch and tend to always go back to the same damn stuff whenever I’m in a jam. So what I will do is simply have titles for what you will be looking for with a quick link along with an accompanying quick description blog post with the same link in there as well.
I.e. this will turn into a list of helpful web developer / website design links for the masses and also save me some sanity so I don’t have to keep typing in the same stuff into google to find what I need. Much more productive for you and I.
Stop in, find what you’re looking for, leave with a smile.
How to Post WordPress Blog Posts on to your Facebook Page or Profile
Took me a bit of time to figure this out myself so I figured I’d post it on my blog to make it easier for all of you. In a business world where you need to be in 40 places (facebook, twitter, instagram, pinterest, wordpress, blah blah blah) at once just to survive on a social media front it certainly helps to condense all this so that you press submit in one platform and it’ll follow suite to all your others.
Combining Facebook, Twitter, and Instagram were fairly simple since apps already exist in their backend to accomplish this. For those who may need this info, I’ll provide it at a later date. Posting your wordpress blog posts to your facebook page however was a little more tricky to figure out but once you follow these instructions you’re gonna go “Oh thank fu&#-ing god!”
So if you have a wordpress blog there’s a VERY handy plug in I discovered to accomplish this. Go to Plugins > Add New and type in “Facebook Page Publish“. There should be two options at show up first both with this name. “Facebook Page Publish” & “Facebook Page Publish 2“. IGNORE the first one. This is an older version and it sucks because you’ll go through the motions and won’t be able to connect. Instead install and active “Facebook Page Publish 2”.
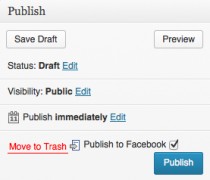
Next go to Settings > Facebook Page Publish. Follow these instructions they provide or read below to get the Application ID and Application Secret code. Next Press the “Grant Access” button and follow facebook plugin options so that the app can get permission to post on your page. Finally go to my previous post to get the link to retrieve your Page or Profile ID and press “Save Changes” and that’s IT. Now when you create a post there will be a check box above the Publish button that says “Publish to Facebook“.
Enjoy it, it’ll be LEGENDARY!
=-=-=-=-=-=-=-=-=-=-=-=-=-=-=-=-=-=-=-=-=-=-=-=-=-=-=-=-=-=
Register & Create the App – for lamens
1. Click Here and register as a developer, if you haven’t already.
2. Click “Register as a Developer” and accept the terms, then just press skip a couple times as the next pages are just survey crap.
3. Once you are registered as a developer select “create new app“, name it “Post My Blog” and press continue (*ignore the name space and hosting option as you won’t be needing it). This won’t affect your page in anyway, it’s only to create the app that will allow you to connect the blog with facebook.
4. Do the damn Captcha thing that only god can read and press continue
5. Now you have your App ID and App Secret but jus ta couple more steps
6. Under Basic Info type in your domain link to your blog without the http://www in the App Domains field: (e.g “streetcarpro.com“)
7. Then at the bottom select “Website with Facebook Login” and type in your domain again this time WITH the http://www (e.g. “http://www.streetcarpro.com“)
8. Lastly select the “Disabled” button to make the app like and out of the developers sandbox.
9. That’s basically it for that now go back to the above instructions on finalizing the plugin connection…